Microsoft’s Network Policy Server (NPS) has been running network authentication in the enterprise for decades but is now out of the loop when it comes to a modern cloud-first infrastructure. Using an inventive approach, I show that it is possible to overcome its recalcitrance and get it authenticating Azure AD-joined (AADJ) as well as on-prem AD clients.
This is the long-form writeup of the project I presented at Microsoft’s Australia-wide Surface Gold & Lighthouse Virtual Event in May 2022.
Warning
Changes enforced by Microsoft since the publication of this post will render it inoperable at a future time. This was initially set for Feb 2023, now delayed to Feb 2025 (see my followup for further information on the specifics of this and part 2 for an updated script that is compatible with these changes and my thoughts on a way forward.
AADJ Incongruities
It seems an age since Microsoft launched Intune (now Endpoint Manager or MEM) and I brought my organisation on board in the first tranche of early education adopters. We had previously been using Google Chromebooks and I was a convert to the notion of cloud-based user identity and endpoint management with minimal on-prem infrastructure.
Migrating to a fleet of AADJ Surface devices was a huge challenge due to the disparity of features and policy options between Intune and Active Directory at the time. That gap has narrowed considerably in the years since to the point where they are now almost at parity and the ‘cloud-first’ option (AADJ / MEM) is a leading choice for even the largest of organisations.
Given this development momentum and market growth, it seems incongruous that there are missing links to support this amongst Microsoft’s own incumbent technologies; none exemplifies this moreso than NPS.
Microsoft’s Aria Carley recently posed an open question on management challenges and I flagged this as top of my list:
Cloud-First Fail
NPS has changed little since its days as the Routing and Remote Access Server (RRAS) and still relies on devices being present in the on-prem AD to authenticate them. This is not the case in a modern cloud-first organisation, where device identities exist only in Azure AD. There is no straightforward route to migrate from legacy password-based (PEAP) authentication to more secure certificate-based (EAP-TLS) methods without replacing NPS with third-party systems such as RADIUS-as-a-service, SecureW2, ClearPass and so on.
Microsoft have a few close-but-no-cigar options for this scenario:
- A device writeback feature in premium versions of Azure AD, but unfortunately this is only supported for specific scenarios not related to NPS authentication and it does not create a usable computer account object.
- The Network Device Enrolment Service, a feature designed for network devices which aren’t in the domain and need to enrol for certificates. I discounted this because having a client certificate is only one side of the issue; NPS still needs that computer account in the domain to authenticate against. Regardless, it needs several additional servers to be installed to the on-prem environment which is not practical for an infrastructure-light, cloud-first org.
- Creating an Azure AD Domain Services instance and having the NPS server join that via a VPN to the on-prem network. This may work but incorporates too many points of failure and delay.
The good news is that there’s a solution, but before I get to that let’s rewind for a quick explainer.
Authentication Types
PEAP is commonplace amongst schools and educational institutions around the country because it is straightforward to manage and inexpensive to run. It involves a credential exchange (username and password) that when verified results in the server’s certificate being used to secure the rest of the process. The client experience is similar to WPA-PSK on a home or public wi-fi, so user familiarity isn’t a problem. The major disadvantage is that since the user’s password is directly tied to their network access, password rotation is necessary to ensure secrecy and shared devices are difficult to manage, since usually the first person to authenticate on a device will have their network credentials stored for all subsequent logons.
EAP-TLS is more secure as it uses certificates on both sides of the transaction, taking passwords out of the mix. With the correct certificate infrastructure, devices can automatically renew their own certificates after predetermined amounts of time to maintain a high degree of secrecy. Further, given that we now use a variety of means to secure user accounts (Multifactor Auth, Azure Identity Protection, Conditional Access, Named Locations, etc) there really is no reason to encumber users with forced password changes other than because of legacy authentication mechanisms like PEAP. In my school context it also enables policy-based control of devices on the network, since only managed devices will have valid certificates. In short, switching to EAP-TLS is safer and more convenient which makes it an absolute no-brainer.
The winning cocktail 🍸
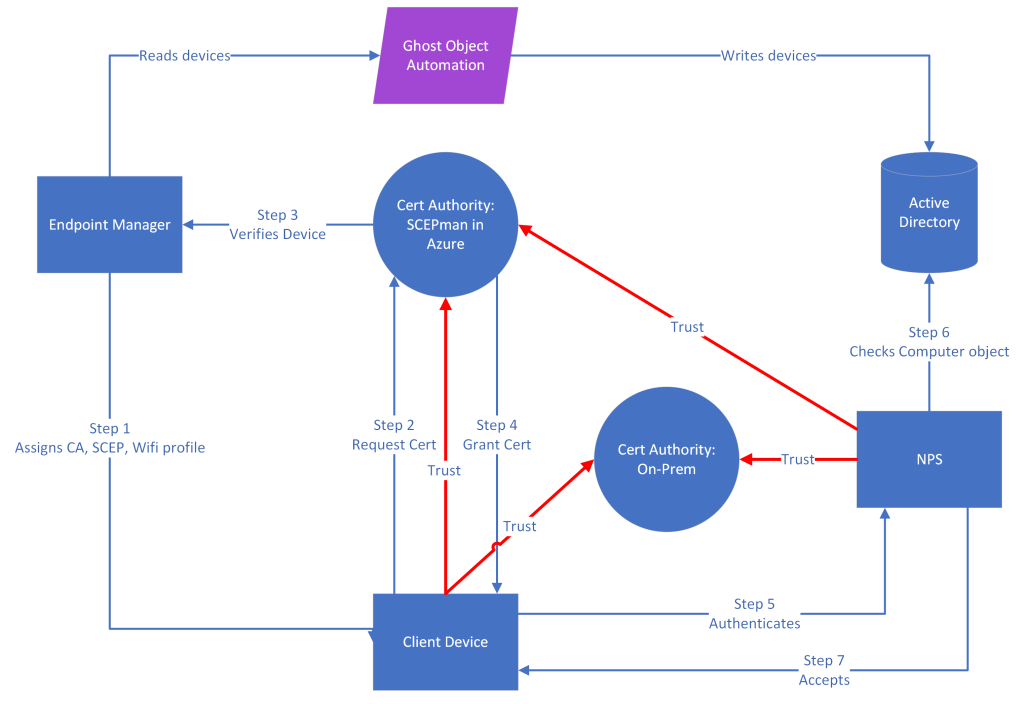
To get this right, we need the following components.
- Cloud:
- A certificate authority (CA) that will issue certificates to our devices.
- A device policy that configures it to trust the CA and request a certificate from it via the Simple Cert Enrolment Protocol (SCEP).
- On-Prem:
- A mechanism that creates a ‘ghost’ computer account object in on-prem AD with matching credentials that can NPS can authenticate against.
- Configuration of NPS to trust the cloud CA and play nicely with the ‘ghost’ objects.
A high-level overview of this is shown below:
Note
If you want to test this out, before proceeding make sure to set up a clean device and assign it to a test Azure AD group in order to avoid applying any settings to production environments until thoroughly vetted.
Cloud Config
While the Microsoft NDES solution allows use of the existing on-prem CA by publishing it via Azure App Proxy, returning to my premise of minimal on-prem infrastructure prompted me to search for means of hosting this in Azure instead. I found a great, free solution in the form of SCEPman community edition. This is a template that deploys a collection of services to your own Azure tenant, comprising of a CA with keys stored in Azure Key Vault and an Azure App Service operating a SCEP and OCSP web service. It can be set to run on the free app service tier and based on my benchmarking that’s sufficient to issue several hundred certs per day. The setup documentation for Intune includes everything needed to get the Azure instance off the ground and policies deployed to devices so I’ll skip forward to this being completed (though ensure to filter these to the test group / device in the first instance).
The only change I made was to use the F1 (free) App Service Plan rather than S1 (standard). Running under the F1 plan will result in a slower response but since the system spends the vast majority of its time idling and certificates are requested and renewed in the background, I have yet to notice an operational impact.
To do this, pop over to your Azure App Service and under Settings select Configuration and then the General tab. Scroll down to Platform Settings and change Platform to 32-bit and Always on to Off.

Then under App Service Plan select Change App Service Plan and select the F1: Free plan. This does not remove the S1 plan so you may have to manually delete it to avoid being billed for its ongoing use.
On-Prem Config
At this point the test device should have the SCEPman root CA cert in its computer store and an device cert issued via SCEP in its private store; so far, so good. Now we get to the pièce de résistance and all credit goes to Andrew Blackburn for his excellent blog on it at SysManSquad.
We create a Powershell script that uses the Azure Graph API to pull Autopilot device info and create ‘ghost’ computer account objects in on-prem AD with SAM account name, Service Principal Name and certificate mapping (altSecurityIdentities) matching the Azure AD device. Andrew’s reference script is reproduced verbatim below:
[CmdletBinding(DefaultParameterSetName = 'Default')]
param(
    [Parameter(Mandatory=$True)] [String] $TenantId = "",
    [Parameter(Mandatory=$True)] [String] $ClientId = "",
    [Parameter(Mandatory=$True)] [String] $ClientSecret = "",
    [Parameter(Mandatory=$False)] [Switch] $NameMap
)

# Get NuGet
Get-PackageProvider -Name "NuGet" -Force | Out-Null

# Get WindowsAutopilotIntune module (and dependencies)
$module = Import-Module WindowsAutopilotIntune -PassThru -ErrorAction Ignore
if (-not $module) {
    Write-Host "Installing module WindowsAutopilotIntune"
    Install-Module WindowsAutopilotIntune -Force
}
Import-Module WindowsAutopilotIntune -Scope Global

# Connect to MSGraph with application credentials
Connect-MSGraphApp -Tenant $TenantId -AppId $ClientId -AppSecret $ClientSecret

# Pull latest Autopilot device information
$AutopilotDevices = Get-AutopilotDevice | Select-Object azureActiveDirectoryDeviceId

# Set the OU for computer object creation
$orgUnit = "OU=Dummy Devices,OU=Devices,DC=yourdomain,DC=tld"

# Set the certificate path for name mapping
$certPath = "X509:<I>DC=tld,DC=yourdomain,CN=your-CA<S>CN="

# Create new Autopilot computer objects in AD while skipping already existing computer objects
foreach ($Device in $AutopilotDevices) {
    if (Get-ADComputer -Filter "Name -eq ""$($Device.azureActiveDirectoryDeviceId)""" -SearchBase $orgUnit -ErrorAction SilentlyContinue) {
        Write-Host "Skipping $($Device.azureActiveDirectoryDeviceId) because it already exists. " -ForegroundColor Yellow
    } else {
        # Create new AD computer object
        try {
            New-ADComputer -Name "$($Device.azureActiveDirectoryDeviceId)" -SAMAccountName "$($Device.azureActiveDirectoryDeviceId.Substring(0,15))`$" -ServicePrincipalNames "HOST/$($Device.azureActiveDirectoryDeviceId)" -Path $orgUnit
            Write-Host "Computer object created. ($($Device.azureActiveDirectoryDeviceId))" -ForegroundColor Green
        } catch {
            Write-Host "Error. Skipping computer object creation." -ForegroundColor Red
        }

        # Perform name mapping
        try {
            Set-ADComputer -Identity "$($Device.azureActiveDirectoryDeviceId.Substring(0,15))" -Add @{'altSecurityIdentities'="$($certPath)$($Device.azureActiveDirectoryDeviceId)"}
            Write-Host "Name mapping for computer object done. ($($certPath)$($Device.azureActiveDirectoryDeviceId))" -ForegroundColor Green
        } catch {
            Write-Host "Error. Skipping name mapping." -ForegroundColor Red
        }
    }
}

# Reverse the process and remove any dummmy computer objects in AD that are no longer in Autopilot
$DummyDevices = Get-ADComputer -Filter * -SearchBase $orgUnit | Select-Object Name, SAMAccountName
foreach ($DummyDevice in $DummyDevices) {
	if ($AutopilotDevices.azureActiveDirectoryDeviceId -contains $DummyDevice.Name) {
        # Write-Host "$($DummyDevice.Name) exists in Autopilot." -ForegroundColor Green
    } else {
        Write-Host "$($DummyDevice.Name) does not exist in Autopilot." -ForegroundColor Yellow
        # Remove-ADComputer -Identity $DummyDevice.SAMAccountName -Confirm:$False -WhatIf
        #Remove -WhatIf once you are comfortrable with this workflow and have verified the remove operations are only performed in the OU you specified
    }
}
To get the script to run, you’ll need it on a domain member (or to create a Powershell mapping) with the ActiveDirectory and WindowsAutopilotIntune modules installed. The App Registration permissions for the script on the Azure side must include the following:

With this in place, the script should be able to run successfully to create the ‘ghost’ computer account objects. There are a few crucial subsequent steps not covered by the SysManSquad blog that I’ll delve into next.
Veering off-piste
With the SCEP certificate on a test device and a corresponding ‘ghost’ computer account object in AD, we depart from the beaten track to make a few obscure changes.
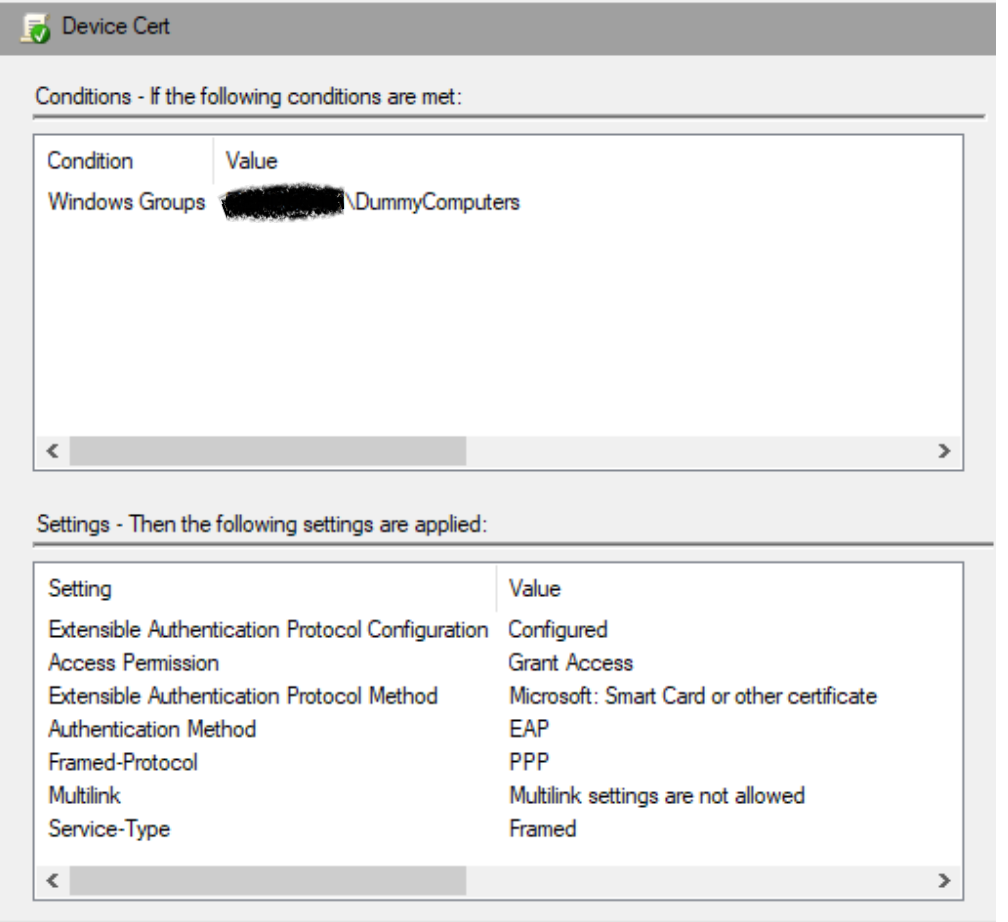
We’ll start with the easy stuff; add all of the ‘ghost’ computer account objects to an AD group and create an NPS network policy with a grant access condition:
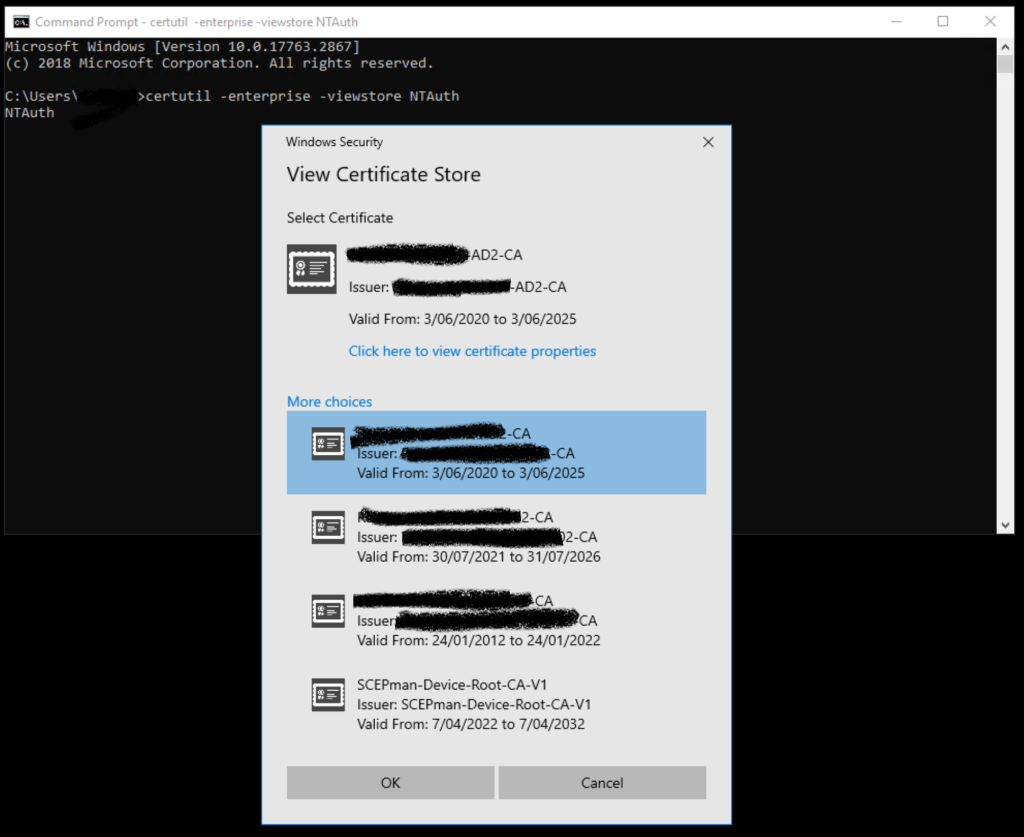
Next we have to make sure NPS trusts the SCEPman CA so it can validate the certs handed to it by clients. To do that, import it to trusted roots in the server’s computer store (reminder: you can fetch it from your SCEPman Azure App Service website). This alone isn’t sufficient though; the cert also needs to be added to the server’s NTAuth store. The NTAuth store doesn’t appear in the certificate management MMC and can only be administered via the certutil command.
Run these commands at an elevated prompt:
certutil -enterprise -addstore NTAuth <path_to_SCEPCA.cer>
certutil -enterprise -viewstore NTAuth
Note
This will add the certificate to the NTAuth store on the current server only. This is fine for testing but if it is a domain controller, this addition will not be permanent. To add to all servers, it must be published to the Active Directory via this different method.
All being well, you should see the SCEPman root included in the list of all CA certs in the NTAuth store:
Finally, we have to disable OCSP checks in NPS to avoid connections failing due to no Certificate Revocation List being specified. Per Microsoft’s instructions:
- Open regedit.exe on the NPS server.
- Navigate to HKEY_LOCAL_MACHINE\SYSTEM\CurrentControlSet\Services\RasMan\PPP\EAP\13.
- Select Edit > New and select DWORD (32-bit) Value and enter IgnoreNoRevocationCheck.
- Double-click IgnoreNoRevocationCheck and set the Value data to 1.
- Select OK and reboot the server. Restarting the RRAS and NPS services does not suffice.
Test and troubleshoot
It’s been a marathon getting to this point but at last it’s time to start up the test device. To summarise, this device should have:
- Policies assigned for:
- Internal CA root (this lets it trust the server cert from NPS).
- SCEPman CA root (required to request a device cert).
- SCEPman cert request (tells the device to request a device cert).
- Wi-fi with EAP-TLS, specifying the SCEPman client cert for authentication (I gave this connection a different name from the SSID to make it clear which connection is being used on the device).
- Policies updated (connecting via ethernet is useful for this so it doesn’t have a pre-existing wireless network connection before the policy kicks in).
- A client cert in its machine store (evidence the policy has worked).
- Visibility of an AP (obvious but always worth a mention!)
- A matching ‘ghost’ computer account object in AD.
All being well, the device should connect automatically using the cert. If that doesn’t happen, NPS logs are a useful starting point for troubleshooting as they may reveal a basic issue, however they are of limited utility in this scenario as they don’t tell the story of certificate validations. The CAPI logs cover this but they are disabled by default and quickly deluged with updates when activated. It can take some effort to find the exact correlation but it will reveal what the server does with the device’s certificate.
User certificates
Up to this point I’ve focused on device-level authentication but SCEPman can also issue user certificates. The advantage of these is that users can be uniquely identified on the network, allowing more accurate logging and application of user-specific firewall profiles. The addition of SID extensions is necessary for SCEPman’s certificates to pass muster with the latest AD requirements.
I’ll write in more detail about this later, since the perfect solution is one that combines both device and user certificates, however in practice this is exceedingly difficult with current technologies.
Notes on my environment
I didn’t need to look at OCSP in SCEPman; certificate revocation won’t provide any benefit since I’m only assigning certificates to managed devices. Users don’t have access to the machine’s certificate store to export the SCEP cert to an untrusted device and if I need to block a device from the network there are simpler means (e.g. disable its ‘ghost’ computer account in on-prem AD). This may still be useful for larger organisations or those assigning certs to unmanaged devices.
We deployed a fleet of several hundred Surface Laptop devices earlier this year in a shared use context (classroom trolleys). We set them up in kiosk mode using PEAP auth with shared credentials and discovered that Windows does not automatically connect to wi-fi at the logon screen in this scenario. Further, if a user logs in with cached credentials and no wi-fi, they are unable to manually connect thereafter. We suspected a bug but after many weeks of head-scratching and Microsoft tech support playing hot potato with the ticket, we moved to EAP-TLS and device certs as a workaround. With the profile assigned to the device, it connects immediately and users can log in without delay. Device certs are a better solution in a shared use context in any case, since each device is uniquely identified when authenticating rather than having all sharing one account.
Running SCEPman on the F1 plan is good for several hundred certs being issued over the course of a day, but it only allows 1 hour of 32-bit CPU time. Given that in an education environment we generally roll out devices en masse at the start of the school year, we may bump this up to an S1 plan for the peak period to avoid breaching the modest limits of the F1 plan. Usage can be monitored by popping into the Azure App Service and under App Service Plan, select Quota.
Thanks
- The SysManSquad for providing part of the solution, though since it was only part I feel like it should be thanks tempered by blame for the hair I lost in getting it right.
- Stephen Rice for sharing his setup for device auth via on-prem AD which was my reference for this.
- Phoebe Hurren for Powershell expertise.
- Noeleen and Rhiannon at Microsoft who listened to me rant ad nauseum about the importance of this and why Microsoft should just build a connector for NPS so it can natively authenticate AADJ devices without all this tomfoolery. Maybe one day they will.
In The Docs
This post was picked up by the team behind the SCEPman product:
Thank you @jabbrwcky for this inspiring article that shows how to bring NPS into the cloud era with smart solutions like @scepman_ and @RADIUSaaS. https://t.co/5AYb47qMw6
— glueckkanja (@glueckkanja_) May 25, 2022
It now features in their official documentation:
Intriguing to see how to lift NPS to the cloud era, and great to see clever solutions to all challenges. The SCEPman Docs now link to this article! And for those who want more convenience, more features, or just save the NPS server, SCEPman has @RADIUSaaS as companion. https://t.co/xIjU8xNTfZ
— SCEPman (@scepman_) May 25, 2022